git workflow using remote repositories to maintain my version of Rails Typo blog
This blog is using Rails based Typo (https://github.com/fdv/typo) as its framework. The Typo project is very active and just went through a major release and upgrade to Rails 3. I maintain the source code for the blog in a private repository; when I upgrade the latest Typo changes into my version, I do so using fdv's repository as a remote source repository. I then merge in the external changes, refine my configuration if needed, and redeploy the blog.
Here is the workflow that I use for these purposes. Starting from the absolute beginning would be to clone the repository, or ensure my master was checked out and its latest changes are pulled in.
# get a pristine copy of my own source, after cloning
# I will be at the HEAD of the master branch
git clone git://private/plasticx.git

# OR

# checkout master and ensure we are at the HEAD of
# master's history of our own source
git checkout master
git pull
Next, I make a remote branch of my repository to isolate my work within it. If for some reason my upgrade has complications while merging that are beyond my expertise I can simply throw that branch away and try again.
# create a remote branch called rails3
git push origin origin:refs/heads/rails3

# track and check out the rails three branch locally
git checkout --track -b  rails3 origin/rails3
The next step is to add fdv's repository as a remote repository and fetch its objects and references. We then merge in fdv's work using one of the release tags he has cut rather promiscuously pulling in the HEAD of his master branch.
# add fdv's typo as a remote repository
git remote add fdv http://github.com/fdv/typo.git

# fetch fdv's commits and merge in his 6.0.8 release
git fetch fdv
git merge release_6_0_8
At this point there was a number of merge conflicts to be dealt with. For instance, I had to update the local gem environment installing the gems specified by the project's new Bundler Gemfile. I resolved these issues and then set the branch in my Capistrano's deploy.rb to use the "rails3" branch I created to isolate the work I'm doing for this upgrade.
# if using Capistrano for deployment, we can set the
# branch we are deploying by setting the branch cap
# will check out for deployment in config/deploy.rb
set :branch, 'rails3'
I like to look at the diff of changes I'm about to commit so I use the -v flag when git is invoked to do so; the diff will be displayed below the commit message prompt in my editor.
# fix merge conflicts, change Capistrano branch, etc.
git commit -a -v
git push
cap deploy
I didn't get a perfect deployment the first time I did this. I had to do a number of iterations getting my blog's configuration set correctly for the shared hosting environment where its hosted at. One of the extra configuration items I had to add was to set the shell PATH for the environment Capistrano runs in on the server. This enabled me to use gems that I had installed locally since I didn't have control of the system gems in that environment. I also set the rake command that Capistrano uses to be invoked via Bundler's exec command.
set :default_environment, {
  'PATH' => "/home/mikemondragon/.gems/bin:$PATH"
}
set :rake, "RAILS_ENV=#{rails_env} bundle exec rake"
Happy Blogging!
MMS2R working in Rails 2.3.x and 3.x
I should have been more vocal about this change in MMS2R. Back in February of this year I released MMS2R version 3.0.0 and starting with that version it was dependent upon the Mail gem, rather than TMail. As you might be aware, Mail is the mail gem that ActionMailer is using in Rails 3. Your "legacy" Rails 2.*.* application can still get the benefits of the latest MMS2R versions even though TMail is used by the older ActionMailers.
Here is an example of patching ActionMailer::Base in a way that we can ignore the TMail object it passes to it's #receive method and instantiate a Mail object that we can use with MMS2R.
class MailReceiver < ActionMailer::Base

  # RAILS 2.*.* ONLY!!!

  # patch ActionMailer::Base to put a ActionMailer::Base#raw_email
  # accessor on the created instance
  class << self
    alias :old_receive :receive
    def receive(raw_email)
      send(:define_method, :raw_email) { raw_email }
      self.old_receive(raw_email)
    end
  end

  ##
  # Injest email/MMS here

  def receive(tmail)
    # completely ignore the tmail object rails passes in Rails 2.*

    mail = Mail.new(self.raw_email)
    mms = MMS2R::Media.new(mail, :logger => Rails.logger)

    # do something
  end
end
Here is a Gist of the above code where you can fork your own copy, etc. http://gist.github.com/486883.
Not to brag or anything, but I heard twitpic is using MMS2R in part of it's application.
Thank you and enjoy!
Getting Passenger to play nice with Interlock, cache_fu, and Memcached
If you are running your Rails application with Phusion Passenger AND you are caching using Interlock AND/OR cach_fu AND you are using the memcache-client library to connect to your memcache server, then you’ll be seeing plenty of MemCache::MemCacheError errors that might look like these
MemCache::MemCacheError: No connection to server (localhost:11211 DEAD (Timeout::Error: IO timeout), will retry at Mon Dec 10 07:47:23 -0800 2010)or
MemCache::MemCacheError: IO timeoutIf you are using the memcached library to connect to your memcache server then you might be seeing a number of Memcached::ATimeoutOccurred errors that look like this:
Memcached::ATimeoutOccurred: Key {"interlock::controller:action:action:id:tag"=>"localhost:11211:8"}If you are the former with memcache-client errors then don’t believe the examples you’ve seen, memcache-client doesn’t work well with the way Passenger spawns Rails processes. Don’t even try it, use the memcached library instead.
If you are using Interlock and cache_fu in the same application then you need to have the Interlock plugin loaded before cache_fu. Do so in config/environment.rb like so
# load the Interlock plugin first so it will load the memcache client specified
# in memcache.yml otherwise cache_fu will load memcache-client
config.plugins = [ :interlock, :all ]
Also, when Passenger spawns a new instance of your application you must reconnect your memcache client from within Passgener’s starting_worker_process event However that code example is vague, here is what it should look like within the Rails::Initializer block in config/environment.rb
Rails::Initializer.run do |config|
  # gem and plugin configs above ....
  if defined?(PhusionPassenger)
    PhusionPassenger.on_event(:starting_worker_process) do |forked|
      if forked
        # We're in smart spawning mode ...
        if defined?(CACHE)
          Rails.logger.info('resetting memcache client')
          CACHE.reset
          Object.send(:remove_const, 'CACHE')
          Interlock::Config.run!
        end
      else
        # We're in conservative spawning mode. We don't need to do anything.
      end
    end
  end
end
What is happening in the code above is that we are closing (with reset) the current memcached connection and are then forcing Interlock to initiate a new memcached connection within it’s helper Interlock::Config.run! method. run! will not fire if the global constant CACHE has already been assigned.
The last thing we need to do is put some timeout protection around the Mecached::Rails client when it is getting and setting values from the memcache server. Interlock has a locking mechanism when its writing to the memcache server and will try to perform the write up to five times if the server doesn’t acknowledge that the write has occured. If a timeout exception bubbles up from the runtime then the purpose of the lock is defeated and it is not able to be retried. The same can be said for reads. Your application shouldn’t have a rendering error if a single read fails to complete from the memcache server. With Interlock if a memached read returns a nil value then all that happends is the code in the behavior_cache and view_cache blocks are executed. Read and write caching errors should not be imposed upon the user’s experience, in my opinion.
To do this make an initializer named config/initializers/memcached_rails.rb as the name reveals the purpose of the file. It will alias method chain Memcached::Rails get and set operations so that they only return nil instead of bubbling up a timeout error when they occur. As I already pointed out if Interlock receives a nil value from a read or a write it will proceed and execute the view_cache and/or behavior_cache blocks you have specified in your application. Memcached::Rails get and set operations underpin Interlock’s reads and writes.
class Memcached::Rails
  def get_with_timeout_protection(*args)
    begin
      get_without_timeout_protection(*args)
    rescue Memcached::ATimeoutOccurred => e
      if (RAILS_ENV == "production" ||  RAILS_ENV == "staging")
        nil
      else
        raise e
      end
    end
  end

  def set_with_timeout_protection(*args)
    begin
      set_without_timeout_protection(*args)
    rescue Memcached::ATimeoutOccurred => e
      if (RAILS_ENV == "production" ||  RAILS_ENV == "staging")
        nil
      else
        raise e
      end
    end
  end

  alias_method_chain :get, :timeout_protection
  alias_method_chain :set, :timeout_protection
end
If you are using cache_fu only, you might not have to be so forceful as I’ve been with Interlock to explicitly reset the mecached client. I’m not certain how to explicitly set memcached as the client library in a cache_fu-only environment either, it seems like it has a preference for memcache-client from the its code I’ve reviewed. Post your experiences in the comments for others to learn from if you are in a cache_fu only environment and use these techniques to overcome timeout errors.
will_paginate and PostgreSQL slow count(*)
When a PostgreSQL database table has many rows of data, selecting the count(*) of the rows can be very slow. For instance, a table with over one million rows on an average performing virtual host can take over 5 seconds to complete. This is because PostgreSQL walks through (scans) all the rows in the table. It can be faster if the count(*) includes conditions on table columns that are indexed.
Assuming a Rails application is using the will_paginate plugin to enumerate over the large table, the rendering of each page will take many seconds to complete. This is due to the expense of scanning all the rows in the table as count(*) will be used in the calculation of the will_paginate navigation. Slow Counting is a known and accepted slow performing operation in PostgreSQL
If the Rails application is paginating over all the rows in a table, then a fast approximation technique can be used in place of the count(*) operation. Assuming a Foo model we mark its conditions as ‘1=1’ so that the will_paginate plugin will use our approximation. The pagination would look like the following
Foo.paginate(:page => params[:page], :conditions => "1=1")In a Rails initializer that we call config/initializers/will_paginate_postgresql_count.rb we use a Rails alias method chain to implement our own wp_count method. wp_count is a protected method defined in WillPaginate::Finder::ClassMethods that is used to determine the count of rows in a table, this determines how the will_paginate navigation is rendered. It is selecting the reltuples value from PostgreSQL’s pg_class where relkind equals ‘r’ and relname is the name of the table used by our Foo class. The catalog pg_class catalogs tables and most everything else that has columns or is otherwise similar to a table.. The pg_class approximation will only be used when the conditions given to paginate are ‘1=1’, otherwise the original wp_count method is called. The code is saved in a Gist and listed below below
will_paginate_postgresql_count.rb Gist
# add this file as config/initializers/will_paginate_postgresql_count.rb
# in a Rails application

module WillPaginate
  module Finder
    module ClassMethods

      # add '1=1' to paginate conditions as marker such that the select from the pg_class
      # is used to approximate simple rows count, e.g.
      # Foo.paginate(:page => params[:page], :conditions => "1=1")
      def wp_count_with_postgresql(options, args, finder, &block)
        if options[:conditions] == ["1=1"] || options[:conditions] == "1=1"
          # counting rows in PostgreSQL is slow so use the pg_class table for
          # approximate rows count on simple selects
          # http://wiki.postgresql.org/wiki/Slow_Counting
          # http://www.varlena.com/GeneralBits/120.php
          ActiveRecord::Base.count_by_sql "SELECT (reltuples)::integer FROM pg_class r WHERE relkind = 'r' AND relname = '#{self.table_name}'"
        else
          wp_count_without_postgresql(options, args, finder, &block)
        end

      end

      alias_method_chain :wp_count, :postgresql
    end
  end
end
Posted in Rails, Ruby, PostgreSQL |
Shoulda macros for rendered partials and globbed routes
Here are a couple of Shoulda macros that I’ve been using. One is to validate that partials are rendered in a view and the other is to validate globbed routes.
should_render_partial
As the name the name implies this macro validates that a partial has been rendered. The macro was born out of the need to test partials being rendered in an implementation of the Presenter Pattern that I wrote. The presenter I wrote was for Appstatz.com a site my friend Shane Vitarana created for tracking iPhone application sales and downloads. The graphs on the site are displayed with the Bluff JavaScript graphing library. The data used by Bluff in each kind of graph was rendered with a composition of different partials. The Presenter Pattern that was implemented was driving which partials were to be rendered based on the state of the application and thus tests were written to validate the implementation of the pattern is acting as expected.
Using should_render_partial takes absolute or relative paths as strings or symbols as its argument and is as easy as this example
class FoosControllerTest < ActionController::TestCase
  context "a beautiful Bluff graph" do
    setup do
      @foo = Factory :foo
      get :show, :id => @foo.id
    end

    should_render_partial 'layouts/_logo'
    should_render_partial :_data
    should_render_partial :_summary
  end
end
The code for should_render_partial is listed below and a Gist of the code is listed at http://gist.github.com/237938
# shoulda validation that a partial has been rendered by a view

class Test::Unit::TestCase

   def self.should_render_partial(partial)
     should "render partial #{partial.inspect}" do
       assert_template :partial => partial.to_s
     end
   end

end
Shoulda loads macros from the test/shoulda_macros/ directory therefore add the macro code to a file in that directory.
should_route_glob
Again, as the name implies should_route_glob tests that if there is a globbing route specified in the config/routes.rb then it is acting as expected. Globbed routes should be the last route mapping in the config/routes.rb file as it will greedily respond to all requests. This kind of routing is used in content management systems and I’ve also seen it used in specialized 404 handlers. For instance if an application is ported to Rails, adding a final controller route that accepts all requests would be useful to track down legacy requests. These requests, their URI and parameters, would be stored in a table so they can be inspected later. Using this technique one can easily find legacy routes that are not be handled by the new controllers, or unexpected routes that are exposed from buggy Ajax requests or odd user input, etc.
The routing (implying a controller named Foo) and its functional test are listed below.
ActionController::Routing::Routes.draw do |map|
  # GET /a/b/c will be exposed to the action as an array in params[:path] and it
  # will have already been delimited by the '/' character in the requested path
  map.any '*path', :controller => 'foos', :action => 'index'
end
The test code is as follows.
class FoosControllerTest < ActionController::TestCase
  should_route_glob :get, '/a/b/c', :action => 'show', :path => 'a/b/c'.split('/')
end
The code for should_route_glob is listed below and a Gist of the code is listed at http://gist.github.com/237987 This code may be a bit verbose as it appears that (as of 11/18/2009) Shoulda is handling globbed routes better. Add a comment if you improve this should_route_glob macro. Shoulda loads macros from the test/shoulda_macros/ directory therefore add the code to a file in that directory.
class Test::Unit::TestCase

  def self.should_route_glob(method, path, options)
    unless options[:controller]
      options[:controller] = self.name.gsub(/ControllerTest$/, '').tableize
    end
    options[:controller] = options[:controller].to_s
    options[:action] = options[:action].to_s

    populated_path = path.dup
    options.each do |key, value|
      options[key] = value if value.respond_to? :to_param
      populated_path.gsub!(key.inspect, value.to_s)
    end

    should_name = "route #{method.to_s.upcase} #{populated_path} to/from #{options.inspect}"

    should should_name do
      assert_routing({:method => method, :path => populated_path}, options)
    end
  end

endVebose Git Dirty Prompt
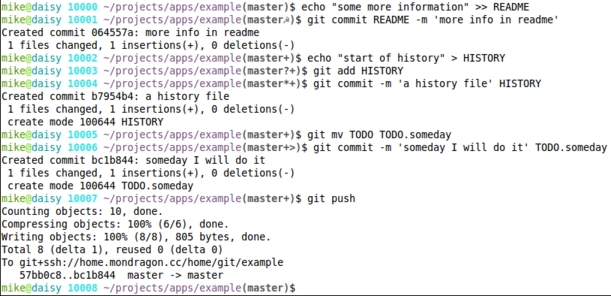
I’ve updated my bashrc with a verbose dirty git prompt which is an extension of Henrik Nyh’s Show Git dirty state post. I wanted my prompt to also indicate additional git states with a single character. For instance I want to know when the local branch is ahead of the remote branch and I do that with the plus ‘+’ character. So if there are modified files in the project, and the local project is ahead of the remote I’ll see ‘☭’ for dirty and ‘+’ for ahead in my bash prompt such as the following
mike@daisy 10006 ~/projects/apps/example(master☭?)$
These are the character codes I used for the git dirty state in the project.
- ‘☭’ – files have been modified
- ‘?’ – there are untracted files in the project
- ‘*’ – a new file has been add to the project but not committed
- ‘+’ – the local project is ahead of the remote
- ‘>’ – file has been moved or renamed
Here is an example in an example git repository
The code for my git dirty prompt is in this Gist http://gist.github.com/217120 and listed below.
- origin of work http://henrik.nyh.se/2008/12/git-dirty-prompt
function parse_git_dirty {
status=`git status 2> /dev/null`
dirty=` echo -n “${status}” 2> /dev/null | grep -q “Changed but not updated” 2> /dev/null; echo “$?”`
untracked=`echo -n “${status}” 2> /dev/null | grep -q “Untracked files” 2> /dev/null; echo “$?”`
ahead=` echo -n “${status}” 2> /dev/null | grep -q “Your branch is ahead of” 2> /dev/null; echo “$?”`
newfile=` echo -n “${status}” 2> /dev/null | grep -q “new file:” 2> /dev/null; echo “$?”`
renamed=` echo -n “${status}” 2> /dev/null | grep -q “renamed:” 2> /dev/null; echo “$?”`
bits=’’
if [ “${dirty}” == “0” ]; then
bits=“${bits}☭”
fi
if [ “${untracked}” == “0” ]; then
bits=“${bits}?”
fi
if [ “${newfile}” == “0” ]; then
bits=“${bits}*”
fi
if [ “${ahead}” == “0” ]; then
bits=“${bits}+”
fi
if [ “${renamed}” == “0” ]; then
bits=“${bits}>”
fi
echo “${bits}”
}
function parse_git_branch {
git branch —no-color 2> /dev/null | sed -e ‘/^[^*]/d’ -e “s/* \(.*\)/(\1$(parse_git_dirty))/”
}
export PS1=’\[\033[00;32m\]\u\[\033[01m\]@\[\033[00;36m\]\h\[\033[01m\] \! \[\033[00;35m\]\w\[\033[00m\]\[\033[01;30m\]$(parse_git_branch)\[\033[00m\]\$ ’
Posted in Git |
more about logging directly to script/console
Logging to the Rails console is an old technique but I’ve noticed many of the examples on the interwebs are broken with the latest 2.3.X series of Rails releases. I believe Jamis Buck’s Watching ActiveRecord Do Its Thing is the popular origin of this technique.
Here is an example that lets you toggle logging on and off in your console. This technique was made popular in Recipe #38 of Advanced Rails Recipes but the original code example is no longer working for me with Rails 2.3.X and MySQL.
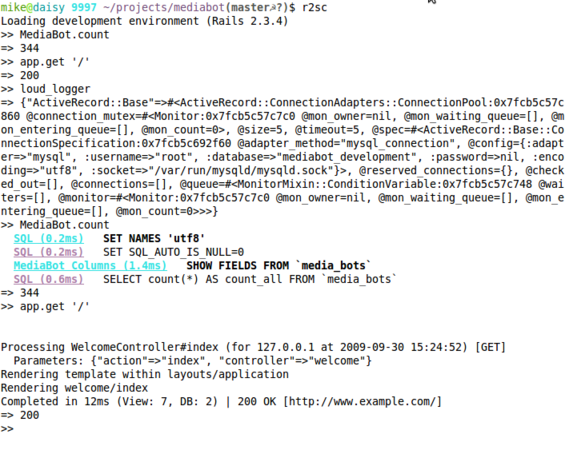
Logging in the console
As you can see below, when I start my console and get a count from one of my models only the count is returned. Also, when I perform a GET to the root of the app only the 200 status code is returned. However, when I turn on logging in the console with the loud_logger method I’ve defined both the output of the ActiveRecord log and the ActionController log are printed to the console.
.irbrc and .railsrc
To do the above you’ll have to put the following code in your $HOME/.irbrc and $HOME/.railsrc . I have a .railsrc so that Rails specific code is loaded from there, leaving generic code for all irb sessions in .irbrc . If you were not aware the Rails console is just an extension of the Ruby irb interactive console. By the way, I store my dot files in my $HOME directory using git, the Huba Huba err.the_blog post is a popular origin of this idea.
This code is at the top of my irbrc and it loads the railsrc only if being invoked by the Rails console.
ARGV.concat [ "--readline", "--prompt-mode", "simple" ]
load File.dirname(__FILE__) + '/.railsrc' if $0 == 'irb' && ENV['RAILS_ENV']
This is the code that is an extension of the Advanced Rails Recipes #38. The loud_logger method will put all logging to the console. The default_logger method will put all logging back to the Rails default which is the log/development.log in development mode. The quite_logger will turn off all logging from the console, and to log/development.log. Execute any of these within the console and described behavior takes effect.
def loud_logger
  set_logger_to Logger.new(STDOUT)
end

def quiet_logger
  set_logger_to nil
end

def default_logger
  set_logger_to RAILS_DEFAULT_LOGGER
end

def set_logger_to(logger)
  def logger.flush; end unless logger.respond_to?(:flush)
  ActiveRecord::Base.logger = logger
  ActionController::Base.logger = logger
  ActiveRecord::Base.clear_all_connections!
end
Resources
Posted in ActiveRecord, Rails |